How-to Article ...by This email address is being protected from spambots. You need JavaScript enabled to view it. of G-Force Hydros

In this step-by-step, Bob English shows you how to build an outrigger, from start to finish!
Building an Outrigger Hydro

The information in this article is taken from a thread on the MGB Hotpit Message Board. I really liked the information that Bob English put together for this thread so I decided to permanently archive it in Modelgasboats.com. The printable version will also make it easy for readers to keep a hard copy of this great information. Marc Levac, Editor MGB.


This
is from a book I wrote to show and explain how a wood outrigger is built. This
is to show you how you can build your own gas outrigger hydroplane race boat.
You will need some wood working skills and some special tools to make the job
easier. The tools that are a must to do a good job are: a belt sander with a 48
inch by 6 inch belt, a table saw, a band saw, a router, a drill press with some
forstner bits and LOTS of clamps. You can see in the first photo a piece of
foam that is 12x36x2 1/2 inches in size. I use a table saw to rip a section 4
inch off the foam block. I now cut it in half so I have two 18 inch long
pieces. In photo two I set my saw at a 35 degree angle to cut the back of the
sponsons. I now take my templates and outline them onto the foam.
My first cut is the inside line. (The side where the pins go in) I set the
table on the band saw at 1 degree for the cut on the bottom of the sponsons.
You want 1 degree of dihedral on the sponson bottom so that the boat has less
contact with the water when it is on plane at speed. I next cut the outer top
angle at 37 degrees, and the last cut is the lower outer angle at 25 degrees.
When you're done you have a piece of foam that looks like a  sponson. The last step on the form
is to lightly run all the angles across the belt sander to smooth it all out.
You can see in photo four a perfect set of sponsons ready for birch sheeting.
Onto photo five. I now take the template and trace out the sponson shape onto
1/4 inch birch plywood. Trace out both sponson pieces and cut them out on a
band saw. Use two clamps and clamp them together very tight. Go to the belt
sander and sand them so they are exactly the same. While they are still both
clamped together drill the sponson pin holes with a forstner 1/2 inch bit. Now
you start gluing. I use 5 min. epoxy so I can hold each piece in place by hand
until the glue sets up. The first to get glued is the piece just cut. After it
has dried you want to sand it very carefully on the belt sander. Remember to
make it exact because all pieces on the sponsons will be following this piece
of wood. You want the outline of the wood and the outline of the foam to line
up exactly.
sponson. The last step on the form
is to lightly run all the angles across the belt sander to smooth it all out.
You can see in photo four a perfect set of sponsons ready for birch sheeting.
Onto photo five. I now take the template and trace out the sponson shape onto
1/4 inch birch plywood. Trace out both sponson pieces and cut them out on a
band saw. Use two clamps and clamp them together very tight. Go to the belt
sander and sand them so they are exactly the same. While they are still both
clamped together drill the sponson pin holes with a forstner 1/2 inch bit. Now
you start gluing. I use 5 min. epoxy so I can hold each piece in place by hand
until the glue sets up. The first to get glued is the piece just cut. After it
has dried you want to sand it very carefully on the belt sander. Remember to
make it exact because all pieces on the sponsons will be following this piece
of wood. You want the outline of the wood and the outline of the foam to line
up exactly.


You
see in photo six the inside is done and the outside pieces are going on. Start
with the upper outside then do the lower outside. What I do is lay the sponson
on 1/16" wood and trace the sponson shape on the wood then cut it on the
band saw. I cut it about a 1/4 inch wider than the foam then glue it on. After
it dries sand the extra 1/4 inch of wood off on the belt sander. Be VERY
careful doing this, if you sand too much you will wreck all  you have done so far. (I had to
learn this the hard way. No one showed me how to do this. I had a lot of trial
and error and taught myself how to make sponsons. Until now no one has written
a paper on this and explained how this is all done. It's been kind of a secret
of the few outrigger builders out there.) Once the edges have been sanded flush
with the foam, you cut and glue the top on the sponson...also 1/16" wood.
The bottom comes next. You can use 1/8" or 1/16" wood on the bottom.
If you want a super tough sponson use the 1/8", if you want a lighter
sponson use 1/16". If you have good foam 1/16" will hold up fine.
you have done so far. (I had to
learn this the hard way. No one showed me how to do this. I had a lot of trial
and error and taught myself how to make sponsons. Until now no one has written
a paper on this and explained how this is all done. It's been kind of a secret
of the few outrigger builders out there.) Once the edges have been sanded flush
with the foam, you cut and glue the top on the sponson...also 1/16" wood.
The bottom comes next. You can use 1/8" or 1/16" wood on the bottom.
If you want a super tough sponson use the 1/8", if you want a lighter
sponson use 1/16". If you have good foam 1/16" will hold up fine.
In photo seven you see what your sponsons should be looking like. Photo eight
shows how big the belt sander should be...large enough to put the whole sponson
on. In photo nine I put them on a table with a 35 degree setting and sand the
back smooth. In photo ten you see one that has been sanded and one that has
not. Once they are both sanded you cut and glue the backs on the sponsons. I
use 3/16" wood for the backs.


In photo eleven the glue has dried and the back pieces are sanded flush with the sides. Your sponsons are almost done. In photo twelve I cut the tip off the sponsons about 5/8 to 3/4 of an inch back. Now glue some small blocks of bass wood in place like you see in photo thirteen. When the glue has dried go to the belt sander and shape the blocks to the lines of the sponsons like you see in photo fourteen. Now if you followed how I said to do all this you should be very proud looking at a nice set of sponsons. After doing all this you now understand why a new set of sponsons from the boat builders will cost you about $200.00. It is a lot of work, but not only are you saving money making your own sponsons; you also get the satisfaction of knowing you did it yourself!


We
now start the tub... In photo fifteen, you start off tracing out the shape of
the templates on 1/4 inch plywood. You do both sides and cut them out on the
band saw. After you cut them out you clamp them together with a few clamps and
go to the belt sander. Like on the sponsons you cut them a little outside the
pencil lines. (Note: always use a pencil and never an ink pen.) You will sand
them down on the sander so they are exactly the same. While they are still
clamped together you go to the drill press and with a forstner 5/8"drill
bit you drill out the sponson tube holes. Also something I do to make things a
lot easier later on in the project is to cut the inside piece of the rear
sponsons. Clamp them together and drill the two mounting screw holes in them.
Now clamp them to the sides of the tub like in photo fifteen. Drill through the
holes in the rear sponson sides and through the sides of the tub. You do this
so when you have the rear sponsons done and you want to screw them to the sides
of the tub it is not a nightmare trying to get the screw holes to line up.
Photo sixteen shows the tub sides done. Now it is time to make bulkheads. I cut
all of them out at what ever height they need to be for the position they are
on the tub. Next I number them 1 through 7 like you see in photo seventeen.  Clamp the together with a couple of
clamps. Go to the belt sander and sand the bottoms flat. (Like everything else
cut the bulkheads a little big and sand them down to size.) I now go to the
disc sander to do the sides. But first you should make sure the table on the
sander is exactly square. I use a square on the table and slide it up to the
disc then level out the table. This is VERY important to do. Now you sand them
down to five inches wide. When they are done lay them out between the tub sides
in the order they are numbered. Like in photo eighteen. (Note: Leave the
bulkheads about a 1/4 inch to tall when you cut them out and sand them down.)
You will see why later. Now is the time to think about any holes you want in
the bulkheads. It is a lot easier to drill them now than when the tub is all
glued together. You see in photo nineteen the holes I drill and cut. I drill a
hole in #3 to pull the gas lines through and also cut a notch on the bottom
center of the same bulkhead. It is so water can drain from the tank area to the
engine area. Bulkhead #5, 6 and 7 have a 5/32" hole drilled by the top for
the water line to go through. Bulkhead #6 is cut out with a jig saw to open up
the radio box area. #6 is mainly a brace and does not have to be solid. If you
cut it out you will find out it will be a lot easier to work on the boat in the
future.
Clamp the together with a couple of
clamps. Go to the belt sander and sand the bottoms flat. (Like everything else
cut the bulkheads a little big and sand them down to size.) I now go to the
disc sander to do the sides. But first you should make sure the table on the
sander is exactly square. I use a square on the table and slide it up to the
disc then level out the table. This is VERY important to do. Now you sand them
down to five inches wide. When they are done lay them out between the tub sides
in the order they are numbered. Like in photo eighteen. (Note: Leave the
bulkheads about a 1/4 inch to tall when you cut them out and sand them down.)
You will see why later. Now is the time to think about any holes you want in
the bulkheads. It is a lot easier to drill them now than when the tub is all
glued together. You see in photo nineteen the holes I drill and cut. I drill a
hole in #3 to pull the gas lines through and also cut a notch on the bottom
center of the same bulkhead. It is so water can drain from the tank area to the
engine area. Bulkhead #5, 6 and 7 have a 5/32" hole drilled by the top for
the water line to go through. Bulkhead #6 is cut out with a jig saw to open up
the radio box area. #6 is mainly a brace and does not have to be solid. If you
cut it out you will find out it will be a lot easier to work on the boat in the
future.


In photo twenty you can see the way I hold the bulkheads while the glue is drying. I use blocks of steel that are perfectly square. Make sure you do something like this so the bulkheads are straight. In photo twenty one all the bulkheads are in. In photo twenty two there are some very important things going on. If you want a straight tub do what I do. First use a three foot level (it's what I use because it's true and won't flex.) and with a couple of small clamps, clamp the first side of the tub to it. Next push the sponson tubes through the side. This is one reason you use forstner bits to drill these holes. Forstner bits will drill a very exact and tight hole. You want it like that so the sponson tubes are tight in the holes. Now slide the other tub side down the tubes and about an inch from the bulkheads. Glue bulkheads # 2, 3 and 4 in place and clamp to dry. Don't try to glue all bulkheads in place at once. Take your time and do it right, not fast. It will pay off in the finished tub. Trust me, learn from my mistakes and don't find out for yourself. # 2 3 and 4 are the ones around the sponson tubes and engine compartment. In photo twenty three you see all the bulkheads are done and drying. In photo twenty four I sand the last bulkhead (transom) and tube sides flat. I cut a piece of 1/4 inch wood to go over the back of the tub. It is wider than the bulkheads because it covers the whole back of the boat including the sides of the tub.


In photo twenty five you see it glued in place. This makes the transom a 1/2inch thick!! It also makes lap joints on the sides. Very strong way to make a transom. Don't forget this step. It has to be done before the top and bottom sheeting are glued on. Photo twenty six shows it sanded and done. The tub is sanded on the top and bottom to remove the extra height on the bulkheads. This makes the top and bottom perfectly flat so you can glue the plywood sheeting on. In photo twenty seven you cut the bottom plywood and glue it in place. I cut mine about a 1/4 inch wider on each side than the tub. I use 1/16 inch three ply birch for this. When you glue the bottom on, use 30 minute epoxy. Have lots of clamps and blocks of wood to hold things in place. You need 30 min. epoxy because this step is a handful and it will take 10 or 15 min. to get the glue on all the bulkheads and tub sides and get the clamps in place. Start in the center and work your way to the ends of the tub. Clamp it and let it sit until the next day.


After it has dried the next day, you can take off the clamps and use a router with a laminate bit to take down the overlapped bottom and make it even with the sides of the tub. Photo twenty eight shows it trimmed and done. Photo twenty nine shows the temporary strips of wood around the radio box. This is done so when you use the router to cut out the top openings it will leave a wide edge around the radio box to put the radio box tape. I use strips of 1/4" plywood for this. Put just a couple of drops of C.A. on the strips to keep them stuck in place. Not too much glue because after you cut the top openings out you want to be able to pop the strips of wood out. Photo thirty shows the top clamped and drying. I use 1/16 inch wood on the top. Now that it has to sit for another day and dry it gives me time to start on the rear sponsons. The inside pieces have already been cut from when the tub sides were being made. In photo thirty one you see I put blind nuts in the backsides to screw the sponsons to the side of the tub. Something to do is, take a little bit of modeller's clay and put in the threads on the back sides of the blind nuts. This will keep epoxy out of the threads when you are gluing the sponsons together. Now make the rear sponsons just like you did the fronts.


It is now the next day and it is time to cut all openings on the top of the tub. You see in photo thirty two I drill 1/2 inch holes in the tub. One for each compartment that will be cut out. It gives you a place to drop the router bit into to start cutting the section out that needs to be cut. In photo thirty three you can see the router doing a great job cutting. It is the right tool for the job. Photo thirty four shows all the compartments cut out and the temporary wood strips taken out from the radio box. Photo thirty five shows the nose piece glued on and sanded to shape. I also put strips of wood around the top of the radio box to support the radio box lid. The tub is now done except for the sponson tube support blocks. Next time we start putting all these pieces together and it starts looking like a boat.


In
photo thirty six you see the rear sponsons are almost done. Just got to sand
the backs flat at 30 degree angle and glue the back plates on. In photo thirty
seven you can see how much extra I leave past the line when I cut the wood for
the  sponsons. After the glue has dried you sand the extra off on the belt
sander. Photo thirty eight shows the rear sponsons done. Photo thirty nine is
the sponson tubes being cut to 13 inch out of 6061 T-6 aluminium. You should use T-6
because it is tempered. There is a lot of force on these tubes and if it is not
tempered it will bend. In photo forty all the pins and tubes are cut. The tubes
are 5/8 o.d. and 1/2 i.d. and the sponson pins are 1/2 o.d. and 3/8 i.d...
These photos are over a year old and early on I was using wood plugs to keep
water from getting into the foam in the sponsons, but I have changed to a
better system. I no longer use the plugs. I cross drill four holes in the end
of the pins. What I do is fill the hole in the sponson about an inch deep with
epoxy and then push the pin into the hole. The glue seals the end of the
pin/foam, and goes through the holes in the pins you drilled and locks the pin
very solid into the foam.
sponsons. After the glue has dried you sand the extra off on the belt
sander. Photo thirty eight shows the rear sponsons done. Photo thirty nine is
the sponson tubes being cut to 13 inch out of 6061 T-6 aluminium. You should use T-6
because it is tempered. There is a lot of force on these tubes and if it is not
tempered it will bend. In photo forty all the pins and tubes are cut. The tubes
are 5/8 o.d. and 1/2 i.d. and the sponson pins are 1/2 o.d. and 3/8 i.d...
These photos are over a year old and early on I was using wood plugs to keep
water from getting into the foam in the sponsons, but I have changed to a
better system. I no longer use the plugs. I cross drill four holes in the end
of the pins. What I do is fill the hole in the sponson about an inch deep with
epoxy and then push the pin into the hole. The glue seals the end of the
pin/foam, and goes through the holes in the pins you drilled and locks the pin
very solid into the foam.
When I do the nose the first thing I do is cut a block of wood to about the size I need. So it hangs about a 1/4 inch over all sides of the front of the tub. Before I glue it on I make a line on the side in the shape of what the nose should be. You know like the leading edge on an airplane wing. Then I tilt the table on the band saw and line the blade up with the line. And cut the leading edge top and bottom. Kind of what half a stop sign would look like. Then glue it on. When it dries go to the belt sander (this is another reason you need a belt that is six inches wide) and tilt the belt so it is straight up and down. Then just very carefully round it off. The final shaping is done with a vibrating hand held sander.


In forty one I use a 1/2 inch drill bit in a drill press to drill the holes in the sponsons. Use a magic marker and make a line on the bit for the right depth you want to drill. If you don't and you are not careful you will drill right through the side of the sponson. What I do is turn on the drill press and hold the sponson with both hands. Then while I'm holding the sponson I hold a bull's eye or bubble level on the side of the sponson so my hole goes straight in. Slowly lift the sponson up while keeping the bubble centered in the level and drill until you get to the line you made on the drill bit. You are now ready to glue the pins into the sponsons. You see in photo forty two I put glue down in the holes and a little on the pins then push them into the sponsons. As soon as they are in, slide the tube onto them. And lay them on a very flat surface. This makes everything line up nice and even.


In photo forty three the sponsons are done and ready to put into the tub. The first thing I do is open up the sponson tube holes in the tub. This is so you can adjust the angle of the sponsons when you are setting up the boat. I make the holes oval shaped so I can move the tubes up and down. In the photos I was using bass wood to make the sponson tube blocks, but I have started using oak to make them. The bass wood, after a couple years, would start getting some cracks in some of them. The oak is about as hard of a wood you can get. It does weigh more but will out last bass wood. I drill out the tubes first then put them into the tub. Make the blocks so they will fit nice into the tub. I drill through the holes in the sponson tubes and into the blocks. Just go very little into the wood with the bit. Just enough so you know where to drill the holes through the block. Take the blocks out and drill all the way through them. I use 8-32 blind nuts on the bottom side of the blocks. Put a little clay in the exposed threads on the bottom of the blind nuts. This will keep the glue from getting up in the threads when you glue them in. Now put a good amount of epoxy on the blocks and set them in the tub. Screw the sponson tubes into them, and then get a square on the side of the tub and up to the tube. Before the glue starts to dry get the tubes square with the tub. Let the glue dry and take out the tubes. Put plenty of glue all around the blocks and into any gaps on the wood blocks. You want these glued very well because all the weight of the front of the boat is supported on these blocks. Photo forty four shows the blocks glued in and done.


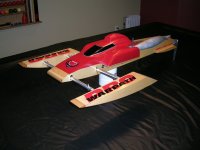
Now you can mount the rear sponsons, fit the cowl and make a turn fin. If you did all of this, congratulations! You have just done something that only a handful of people know how to do. Now you set up your motor, hardware, radio, tanks and driveline and you're ready for paint. Photos 45, 46, 47 and 48 are what your rigger should look like.


The last two photos are of some ready to race G-Force Hydro outriggers!
As you can see in the detailed instructions above, building your own outrigger hydro is not something that is impossible, but without the right tools and some basic wood working skills it can quickly become an overwhelming task! For those who are not comfortable tackling this task on their own, you can purchase your very own G-Force Hydro outrigger from Bob English.
Here is what you get:
- finished hull ready to seal
- sponson tubes cut to proper length
- sponson tube seals
- pins set in the sponsons
- mounted turn fin
- installed sponson tube blocks
- A.B.S cowl (un-mounted and un-trimmed)
- radio box lid
- setup instructions
The price is $395.00 USD each plus shipping. (may change without notice...confirm with Bob)
Contact Information:
G-Force Hydros
Bob English
Phone: 707-425-2453 (business name is Mr. Bicycle ... ask for Bob)
Business hours are Mon.- Fri. 9:00-6:00 Sat. 9:00-5:00 and closed on Sunday
Email: This email address is being protected from spambots. You need JavaScript enabled to view it.