Tech Article ...by Mike Tyson

Interesting information on how to duplicate propellers using this tool...
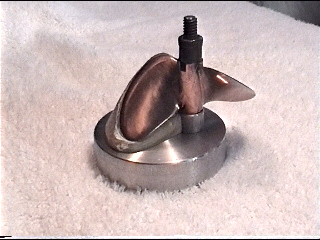
Editor's preface: In Issue #2 (August 2002) of ModelGasBoats.com, we reviewed Mike Tyson's T-Mod Stinger Muffler . In this issue, we asked Mike to tell us how he makes propeller duplication tools, or Prop Molds as he calls them.
The Prop
Mold, sometimes referred to as a "duplicator," can be used to make a permanent
cast fro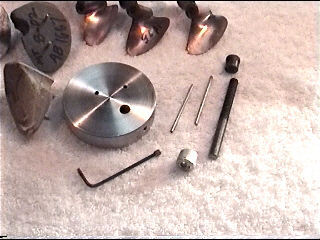 m
a favorite prop, then the cast can be used to either restore that prop after
damage or to make a new prop with a similar form.
The Prop Mold is also an excellent tool for comparing two props, or the two blades of one prop. Blade shape differences that are not obvious by other means become very apparent if you make a cast of one blade and then place a different one against it.
A cast is made from epoxy putty by pressing the prop against the putty and letting it harden. After curing for a day or two, the putty is strong enough to be hammered on. It works best to first use the cast for comparison while bending the prop using other methods, such as pliers, hammering over a ball form, etc. I prefer to over bend the prop slightly, then place it on the mold and hammer it lightly to get it back to the desired shape. A leather, plastic, or shot-filled plastic hammer works well.
Making your Prop Mold
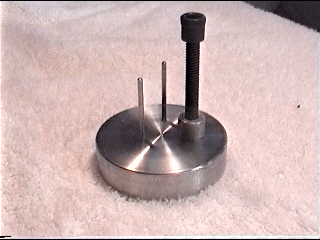 It's easy to make your own prop mold. Start with a thick piece of
aluminum or other suitable material for the base. In the picture, the base is a
round piece cut off the end of a larger piece of bar stock, but I also make them
using a square piece cut from ½" thick flat stock. Drill a ¼" hole vertically
and then drill an intersecting hole horizontally for a screw or set screw to
hold the prop shaft in place. Cut the head off a 2-1/2" long bolt to use as the
prop shaft. You could also use an old stub shaft cut to length. Thread the set
screw hole. Use a ¼" collar as a spacer for the prop. Get a wing nut to hold the
prop in place on the shaft. Now place a prop face down on the shaft and draw the
outline of one blade onto the base. Drill two holes within the outline, the
right size for pieces cut from 4-40 control rods to act as locator pins on the
casts. Don't drill the locator pin holes all the way through the base! That way,
the pins won't fall out when you move the thing around on the table when getting
ready to make a cast. The cast locator pins are cut from 4-40 size steel control
rod. One is shorter than the other so they don't come through the cast and mar
the propeller blade. That's all you need to do, you now have a Prop
Mold.
Supplies needed
The epoxy
putty is sold in hardware stores in the plumbing department under the name
"plumber's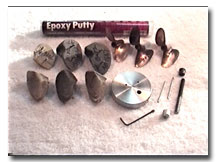 epoxy putty." It is a single-part compound whose hardener is activated when you
knead it. There are similar products sold in auto supply stores and marine
supply stores, generally at higher prices. I don't recommend auto body fillers
(Bondo) for this job. About 2 ounces of putty is needed to make one cast of a
large prop. The tube of putty in my picture is the 4-ounce size, enough for two
casts. You also need some waxed paper from the kitchen and some silicone grease
from the auto parts store. You need some rubber gloves and some sturdy leather
gloves.
Making a Cast
Please read this carefully before you make any casts: Epoxy putty can stick tenaciously to metal surfaces including your best propeller's blade, and may never come off unless you first apply a release agent! I have used silicone grease such as Permatex® dielectric silicone grease (available from auto parts stores) with good results. Try others at your own risk. Please don't let the cast get permanently stuck to your friend's best prop! Heating the prop might release it, as a last resort.
Six Easy steps to making a cast:
- Punch a ¼" hole in a small square of waxed paper and use it to cover the flat base of the mold. Push two cast locator pins through the waxed paper. Put the spacer in place. Check that the pins won't touch the prop.
- Apply the
grease liberally to all of the prop's surfaces, as well as the prop shaft and
shaft
 spacer on the mold before you mix up the putty. Don't grease the
locator pins.
- Wear rubber gloves for the next two steps. With the prop off the shaft but the waxed paper, pins, and spacer in place, mix up some putty. Knead it thoroughly (until it becomes a uniform color) then roll it into an egg shape and press it down over the locator pins.
- Place the prop onto the shaft with one blade on the ball of putty, pressing the hub all the way down to the spacer. Tighten the wing nut, then use wet fingers to shape the putty around the prop. Make it come off level with the prop's face along the sharpened edges and leave a ridge at the prop's trailing edge to serve as a locator when you put a prop on the cast later.
- After the putty has set up (about a half hour) but before it has set too long, lift the prop and cast together off the base. Wearing leather gloves so you don't cut a finger, pop the cast loose from the prop. The locator pins stay imbedded in the cast. Clean up the prop immediately with lacquer thinner.
- Use a pencil to write the date and what prop the cast was taken from on the bottom of the cast.
Using the Casts You Make
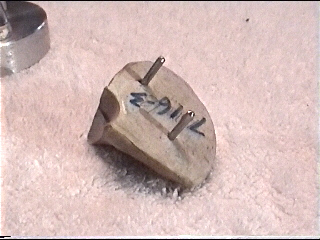 When you buy a new professionally built prop, make a cast off it
before you use it, as insurance for your investment. The same advice applies to
any favorite old props you have in your collection. Take the Prop Mold to the
pond when you go. If you ding a prop that you made a cast from earlier, put the
prop onto the Mold and lightly bump it back into shape.
When you work up a new prop, place it on the Prop Mold from a cast of a good prop to check your work as you go. It does not produce an exact duplicate of the original, but allows you to get very close. Since metal has some spring to it, simply placing a prop on the cast and banging away won't make it the same shape as the cast. But you can get it close.
The Prop Mold is a great way to compare the two blades of a prop to see that both blades are the same shape and pitch.
If you have two props that look alike, make a cast from one and place the other against it, and you might see quite a difference, explaining why one works very differently from the other. Sometimes, a little work with a Dremel® and drum sander is needed to open up the hub area on a cast so a different prop will go down onto the blade area.
If a friend has some great running props, see if he'll let you make casts from some of them. Then you'll have the casts to use as guides when you work up a new prop - and just maybe, you'll be able to help him when he bends or loses his best prop! Don't forget to use plenty of silicone grease on HIS props, and write the particulars on the bottom of each cast so you know where it came from.
The Prop Mold is a very useful tool that is easy to build and has many applications. Never leave home without it.
Contact Mike for more information on the Prop Mold, prop tools, and stinger mufflers he manufactures and sells:
Mike Tyson
- T-Mod Racing
Richmond, VA 23233
Phone: (804) 360-5432
e-mail: This email address is being protected from spambots. You need JavaScript enabled to view it.

