Product Review Article ...
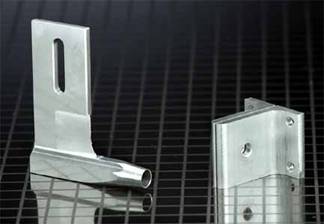
A look at Speedmaster struts and rudders...
 As most boaters know, there are
many different brands and styles of hardware available on the market today, most
of which excel in their designed-for applications. Speedmaster hardware is of
the "conventional" type, if we may use these terms. The hardware consists of a
strut blade, and separate rudder assembly. Speedmaster manufactures many other
accessories, such as tuned pipe brackets, trim tabs and drives. In this article
we will discuss struts, rudders and trim tabs only.
Struts: Many different struts are available. They are manufactured in different lengths and sizes (.187 or .250 shaft) and with flat or round bottom, for more or less lift from the strut. Whatever your application, Speedmaster most likely has the strut you need. Struts and brackets are made of machined aluminum and the mounting hardware is stainless steel. Expect to pay anywhere between $20 and $30 for a strut assembly.
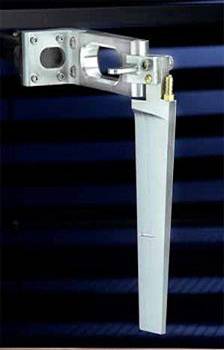 Rudders: Speedmaster
rudders also come in a variety of shapes and sizes. All of their rudders are of
wedge design. They are made of machined aluminum and feature a stainless steel
"pin" type hinge with brass pressed-in bushings. Mounting hardware is stainless
steel. Expect to pay anywhere between $40 and $55 for rudder
assemblies.
Trim Tabs: Speedmaster trim
tabs come in 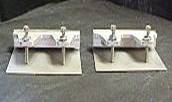 different
configurations, including single and dual tabs.
All are low profile and include screw adjusters with lock nuts. The brackets are made of machined aluminum. The plates are made of stainless steel, as is the mounting hardware. Prices are $20-$25 /set.
Setup information
The first thing you'll notice when you first receive your Speedmaster hardware is its simplicity. But don't let that fool you! It's very lightweight and effective hardware. The parts come with mounting bolts and nuts. The machine work is clean and precise. The parts can also be polished to a beautiful shine with little effort if desired.
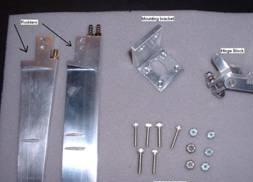
The rudder assembly arrives with hinge block, bracket, extension (if applicable) and rudder blade all detached.See Figure 4. The rudder blade is fixed to the hinge block using the supplied nuts and bolts. The upper one is stainless steel, and the lower one is a small brass sheer bolt which will break in case of collision and allow the rudder to "kick" up. The hinge block is then fixed to the bracket. If an extension is included, it will be installed between the mounting bracket and hinge block. The rudder assembly mounts to the transom with four 6 -32 S.S. bolts and nylock nuts. There is a set screw in the hinge block which secures the hinge pin in place. Check this set screw to make sure it is tight otherwise you could lose the hinge pin and the assembly will come apart. Having the hinge block separate from the kick-up rudder is a huge benefit – should the rudder kick-up, there is no stress placed on the control arm, steering control rod, or steering servo!
Speedmaster rudders have single or dual water pickups in the blades. One cannot help but wonder, though, why the water pickups in the Speedmaster rudders are not on the right-hand side. It is strongly recommended that the water pickup hole be drilled out to 1/8" diameter to insure proper water feed to motor and accessories. This can be done using a aircraft type drill bit (usually 12" long) available at most hardware stores. It is also a good idea to drill out all water fittings to 1/8" diameter and use 1/8" I.D. diameter silicone tubing. If you plan on drilling the rudder, be careful with the angle in which you drill so as not to drill a hole through the side.
Trim tabs are assembled while mounting them to the transom. The plates are placed first, then the aluminum bracket over the plates. Mount the lower edge of the tabs no closer to the bottom of the transom than 1/16 of an inch. The mounting bolts go through the brackets, plates, and transom, which holds it all together. Once mounted, install the adjusting screws and lock nuts.
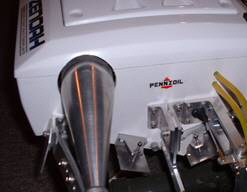
Assembling the strut is quite easy. Simply install the two mounting brackets on either side of the strut blade, to "sandwich" the blade between the two using the included bolt and nylon lock nut. Use of a square and a flat working surface is recommended make sure everything is straight. The assembled strut mounts to the transom with the included four 8-32 socket cap bolts and nylon lock nuts. See Figures 5 and 6 . That is it! The hole in the strut blade is slotted vertically, which allows for up and down adjustment of the strut. To do this, simply loosen the bolt holding it tightly between the two angle brackets. Loosening this bolt will also allow for angle adjustments of the strut. Only one bolt is needed for all adjustments…simple and effective! Figures 7 and 8 show a typical setup. Note the spare drive dog used on flex shaft at motor end to prevent complete assembly from falling out (and into the pond) should motor collet come loose.
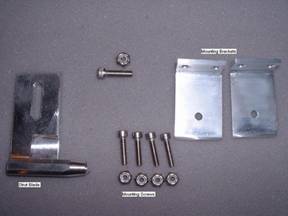

Below is a picture showing basic components needed for a typical Speedmaster strut setup. Required are a welded flex shaft, strut bearing and brass stuffing tube.

Fig. 8
Maintenance
Due to the simplicity of this hardware, very little maintenance is required. The rudder assembly features a hinge block made of aluminum with a stainless steel hinge pin in brass bushings. Oiling the bushings occasionally can help prolong their life. The hinge block can be purchased separately from Speedmaster, should it wear and become too loose.
As far as the strut assembly goes, if you use a good quality flex shaft that is straight and true, and lube it regularly, you should have very little wear to the bearing and stuffing tube. A regular inspection when lubing will allow you to notice any areas that may be wearing prematurely, should there be a problem. Some people use self-lubing systems or lubing systems that do not require removal of the flex shaft. This is OK, but it is still recommended to pull the flex shaft regularly to inspect it and the strut bearing for anything out of the ordinary. Strut bearings can be purchased from suppliers such as Rocket City Racing for a very reasonable price (about $3.50 US). You can also make your own bearings with the proper size brass tubing and a flaring tool.
Conclusion
The Speedmaster hardware is simple, light weight, and effective hardware suitable for racers, and sport boaters alike. The quality and reputation of Speedmaster speaks for itself!
Sources for Speedmaster hardware:
Speedmaster Model Products
Division of Rossi Sales of America
1325 Carol
Drive, Memphis, TN 38116
PH(901) 396-7485, FAX(901)
346-8923
www.rossisales.com/index.html
Rocket City Racing
20706 Melville
St
Orlando, Florida. 32833 USA
PH: 321-217-4588
FAX:
407-568-2893
www.rocketcityracing.com

