Product Review Article...

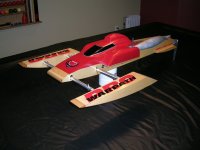
Our review of the EasyVee offshore style mono from Zippkits...an economical way to get into gas boating fast!
Welcome to the world of Zippkits...easy to build gas boat kits at an affordable price! The EasyVee is the second boat from Zippkits that I have personally built. The first was the I-Box. You can see our review of the I-Box by clicking THIS LINK.
The EasyVee really lives up to its name! This is just about as easy as it can get to build a good quality wood boat for gasoline power. The finished hull measures 46.5" long with a beam of 13". The design is a deep "V" with only 2 strakes on the bottom and no spray rails. All parts are CNC cut. Birch plywood bulkheads, radio box and sheeting. Engine rails are 1/4" marine grade plywood.
The nice thing about the kits is that they are shipped in a flat box which really cuts down on shipping cost and translates to savings to the buyer. Here are a few pictures of the kit as received from Zippkits.


As with all Zippkits boats, the EasyVee comes with a comprehensive instruction/assembly manual which details all steps of the building of your boat from start to finish. The manual even includes setup tips and a troubleshooting section. For this reason I will not go into every detail about building the EasyVee but I will however cover the major steps and show many pictures detailing the actual build.
Building the EasyVee...
Without a doubt, the single most important thing to have in order to succeed at building the boat successfully is a perfectly flat and solid building platform. The boat is built upside down on a supplied jig that MUST be attached to a flat working surface. If you build the boat on a crooked work surface, you WILL have a crooked hull and this will translate into a poor handling boat.
I actually spot glued the jig onto the table using some CA adhesive. It is easy to remove it and sand away the CA once the build it completed. If you do not want to glue or nail the jig to your work table, get a good straight board that you can set on your bench and mount the jig to.
Below you can see the first step of the build which include setting up the jig, mounting the bulkheads, the keel and the engine rails. It is important to use a square to make sure that all the bulkheads are straight in relation to the jig and to each other. You can also see that the stringers are installed and how they taper together into the nose section. The stringer installation can be a little tricky but the important points are explained in the manual.


The following steps are to blend in the stringers in order to prepare the frame for the sheeting. There is some amount of "elbow grease" involved in building a wood boat. The use of a wood plane and sanding block is required throughout the process. I made things a little bit faster using a small belt sander for some steps, but this must be done very carefully and only for roughing. For the first time builder I would recommend staying away from the power sanders and take your time with the mini wood plane and sanding block.


Here are a couple pictures of the bottom sheeting all done. As can be seen the edges all have to be sanded smooth and blended together. Follow the instructions to know where to round the edges and where to keep them sharp...this is important!


With the bottom all done the boat is cut away from the jig and the bulkhead tabs (which connected the bulkheads to the jig) are trimmed away. At this point you will want to have a stand ready to sit you hull into so that you can complete the following steps.
The inside of the hull is completely sealed with epoxy and certain areas are reinforced with fiberglass cloth. The top sheeting pieces are then mated together and the deck is test fitted on the hull. When everything is satisfactory, floatation is inserted between the bulkheads in the nose of the boat and the top sheeting is coated with epoxy on the underside and it is installed on the hull. Weights and tape are used to ensure the sheeting staying in place and is making good contact all over until the epoxy sets.
* note the deck support dowel in the first picture below. This is to reinforce the deck area so you can grab the boat for a single hand launch. I really like this feature...it comes in very handy when you are alone at the lake and makes launching a breeze. The boat is designed to allow for mounting the dowel to either the port or starboard side.


Here are some pictures of the boat all sheeted and sanded ready to be sealed, primed and painted. I used West Systems epoxy for sealing the inside and outside of the EasyVee. It is important to use a good quality epoxy and to seal the hull properly. After sealing the strakes were installed and sealed also prior to painting the hull.
*I did a slight modification to the strakes layout on the boat...the front of the strakes are curve up towards the deck in the first 6 inches or so. This is not the way the instructions say to install them, it was just a test on my part. The idea was to have them pull up the nose in a turn if the nose went down deep. I had planned on setting the boat up tight for racing conditions...so far this seems to have worked out nicely. I did not test with the straight strakes however prior to doing this, so I cannot really know if it actually made a positive difference or not, just that it works well as is.


The kit also includes a radio box that you build with the pre-cut plywood pieces and also a windshield. I did not install the windshield simply because of personal preference.
Hardware installation...
For hardware I used turn fins supplied by Zippkits, homemade trim tabs that are 1.5" wide by 2 inches long, a modified Speedmaster rudder that puts the leading edge at 5.5" from the transom and a homemade stinger drive that puts the leading edge of the propeller at 5" from the transom.


At the lake...
The first time I ran the EasyVee was with a fully modified Zenoah 260 from CC Racing Engines and I could tell right away it was overpowered. I switch the motor to a stock Zenoah 260 with a tuned pipe and made some adjustments.
The drive has about 3 degrees of negative angle (prop end down from neutral). The rudder is perpendicular to the keel of the boat and vertical. The turn fins are perpendicular to the bottom of the hull. The starboard side fin is mounted as deep as possible and inline with the chine and the port (left side) turn fin is mounted about 3/4" higher than the starboard one. The trim tabs are all mounted 1/8" up from the bottom of the boat. The inner tabs are adjusted so that the trailing edge is about 1/16" up from the bottom of the boat. The outer tabs are level.
I also added about 4 ounces of lead weight in the front of the boat in the pool noodles just forward of the motor to bring the C.G. of the boat to 34%. Props recommended by Zippkits include the 7016 or Prather 270. I did have good luck with a 7016/2 but with my setup the best overall performance I found was with a Propworks modified X472/2.


Final thoughts...
With these setting the boat performed flawlessly. It was fast and stable in the straights and cornered very well. The boat is designed to be a high lift hull for use primarily as a sport boat, yet I was pleasantly surprised by it's overall performance.
I think the EasyVee is a great boat if built and setup correctly. It will make a great entry level sport boat for someone wanting to get into the hobby on a budget. I also think it could be successfully raced at speeds in the low 50's range if properly tuned. Although it could probably be used with a modified engine, I think it is better suited to stock engines. Definitely a great candidate for the Super Sport Class!
In short...at $59.00 plus $14.00 shipping in the U.S.(confirm current pricing on Zippkits website), if you are willing to build a boat from a kit, you simply can't go wrong with the EasyVee! For roughly $100-$125 including epoxy you can build a great performing mono!
Happy Boating!
Contact Information:
Zipp Manufacturing
Joe Petro
Website: www.zippkits.com
Email: This email address is being protected from spambots. You need JavaScript enabled to view it.